

Remote access has become a core part of modern network design. Users no longer sit inside the office network—they connect from home, from mobile networks, and from anywhere with internet access. That means your firewall is no longer just protecting internal traffic. It is also responsible for securely exposing access to internal resources.
For a long time, SSL VPN was the go-to option for remote access on FortiGate devices. It was simple to deploy and worked well across different environments. But over time, the landscape has changed.
IPsec VPN is now the preferred approach for remote access. It provides a more controlled, standards-based method of establishing secure tunnels, with a smaller exposed attack surface and better alignment with modern security practices.
In this guide, you will set up IPsec VPN for remote access on a FortiGate, step by step. This is not a migration guide. The goal is to show how to build a clean remote access setup using IPsec VPN, especially if you are working with newer firmware where SSL VPN may no longer be available.
Why Is Fortinet Removing SSL VPN?
Several factors are driving this shift, and it is not specific to Fortinet alone. The entire industry is moving in this direction.
SSL VPN has always been convenient, but it comes with trade-offs.
One of the main concerns is resource usage. SSL VPN relies on web services and encryption handled at the application layer, which can consume significant CPU and memory on the firewall. On smaller FortiGate models, this directly impacts performance. By removing SSL VPN from these devices, Fortinet ensures that resources are available for core firewall functions.
Security is another major factor. Remote access services are exposed to the internet, which makes them a prime target. SSL VPN in particular has been involved in multiple high-profile vulnerabilities over the years—not just on FortiGate, but across different vendors. Attackers actively scan for exposed VPN portals, and unpatched systems are often the entry point into networks.
There is also a broader architectural shift happening. Organizations are moving toward Zero Trust Network Access (ZTNA), where access is granted based on identity, device posture, and strict policies rather than broad network access. Fortinet is aligning with this model through solutions like FortiClient EMS and FortiSASE. In that context, IPsec VPN fits better as a controlled transport mechanism, or is replaced entirely by ZTNA in more advanced deployments.
Affected Devices and Firmware Changes
Fortinet has already started enforcing these changes in recent FortiOS versions.
From FortiOS 7.6.3 onward, SSL VPN is no longer available. This is not a limitation—it is fully removed from the system.
In the 7.4 branch, the change is more targeted. Starting from FortiOS 7.4.8, entry-level G-series FortiGate models such as the 50G, 70G, and 90G no longer support SSL VPN.
This is important to understand before performing any upgrade. If your device falls into these categories and you upgrade the firmware, any existing SSL VPN configuration will be removed. Remote users will immediately lose access if no alternative is in place.
What Should You Do?
If you are currently using SSL VPN on an affected device, you need to plan ahead.
Fortinet provides official migration documentation that walks through converting an existing SSL VPN setup to IPsec:
These guides are useful if you already have a working SSL VPN configuration and want to transition it.
However, this article takes a different approach.
Instead of focusing on migration, you will build a remote access solution using IPsec VPN from the ground up. This is especially useful if you are deploying a new FortiGate, working with newer firmware, or simply want a cleaner design without relying on SSL VPN at all.
By the end of this guide, you will have a working IPsec remote access setup that can fully replace SSL VPN for your users.
Creating the IPsec Remote Access VPN
On a FortiGate, you can build an IPsec VPN either manually (custom configuration) or by using the built-in wizard.
The custom method gives you full control over every parameter—Phase 1, Phase 2, proposals, lifetimes, and advanced options. It’s useful when you need very specific configurations.
In this guide, we’ll use the wizard.
It simplifies the setup, reduces the chance of misconfiguration, and gets you to a working VPN quickly.
That said, using the wizard does not lock you in. Once the tunnel is created, you can still open it and modify every setting just like a custom configuration.
Step 1: Launch the VPN Wizard
From the FortiGate GUI:
Navigate to VPN → IPsec Wizard
You will be presented with the VPN setup screen.
[IMAGE: VPN Setup screen]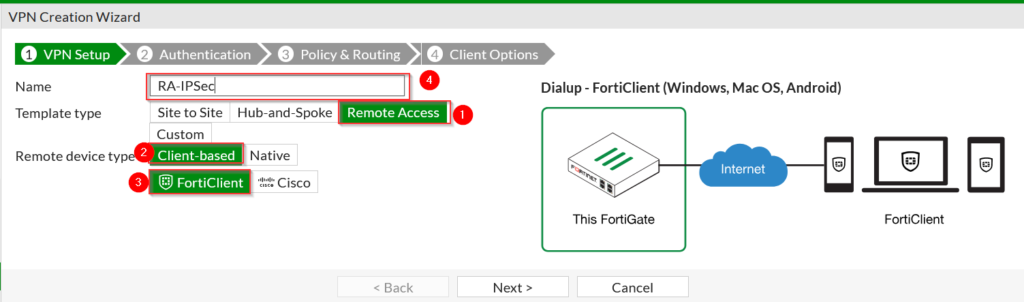
Select the following:
- Template Type: Remote Access
- Remote Device Type: Client-based
- Client: FortiClient
Set a name for the tunnel, then click Next to begin the configuration.
The Template Type defines the purpose of the VPN. In this case, Remote Access is used for users connecting from outside the network, rather than linking two sites together.
The Remote Device Type determines how the connection is initiated.
- Client-based is used when individual devices (laptops, phones) connect using a VPN client
- Native is typically used for built-in VPN clients or third-party implementations
Since we are using FortiClient, Client-based is the appropriate choice.
Under Client, you will notice options such as FortiClient and Cisco.
- FortiClient is Fortinet’s official VPN client and integrates directly with FortiGate features
- Cisco is used for compatibility with Cisco IPsec clients (for example, when migrating or supporting mixed environments)
In this guide, we use FortiClient, as it provides the best compatibility and is the recommended option for FortiGate deployments.
Step 2: Configure Authentication
In this step, you define how the VPN tunnel is established and who is allowed to connect.
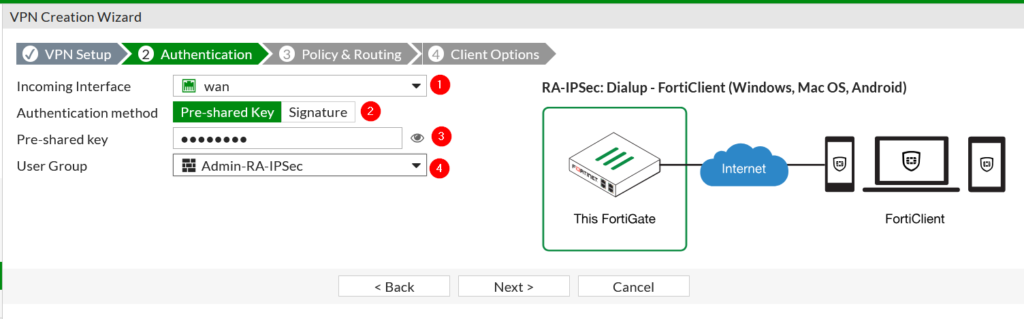
Start with the Incoming Interface.
This should be your internet-facing interface (typically wan). This is where the FortiGate will listen for incoming VPN connections.
Next, choose the Authentication Method.
You have two options here:
- Pre-shared Key (PSK)
- Signature (certificate-based authentication)
In this guide, we’ll use Pre-shared Key to keep the setup simple and quick. It’s widely used and easy to deploy, especially in smaller environments.
Certificate-based authentication provides stronger security and is commonly used in more advanced deployments, but it requires additional setup such as a PKI or certificates on both the FortiGate and client devices.
Enter a strong Pre-shared Key. This key must match on both the FortiGate and the FortiClient.
Then select a User Group.
This controls who is allowed to authenticate after the tunnel is established. Only users in this group will be able to log in through FortiClient.
It’s important to understand the difference here:
- The pre-shared key establishes the tunnel
- The user credentials control access to the network
Once everything is set, click Next to continue.
Step 3: Policy & Routing
This step defines what the VPN users can access and how traffic is handled once connected.
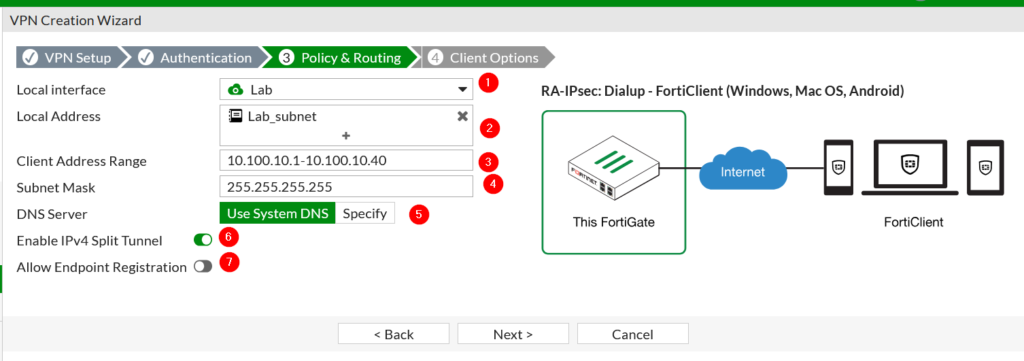
Start with the Local Interface.
This is the internal interface where your resources are located (for example, Lan, Internal or in our case Lab). This tells the FortiGate where the VPN traffic should be routed after users connect.
Next is the Local Address.
This represents the internal network that VPN users will be allowed to access. In the example, Lan_Subnet is selected. This could be something like 192.168.1.0/24 depending on your environment.
This is important—whatever you define here is what users will be able to reach through the VPN.
Client Address Range
The Client Address Range defines the IP addresses that will be assigned to VPN users.
For example:
10.100.10.1 – 10.100.10.40
These are virtual IPs given to remote clients when they connect.
Make sure this range:
- Does not overlap with your internal network
- Is not used anywhere else in your environment
Subnet Mask
The subnet mask defines how the client IP range is structured.
In most cases, the default 255.255.255.255 is used, which assigns a single IP per client.
DNS Server
You can choose how DNS is handled for VPN users.
- Use System DNS: Uses the DNS configured on the FortiGate
- Specify: Allows you to define custom DNS servers
If users need to resolve internal hostnames, it’s better to use your internal DNS server.
Split Tunneling
Enable IPv4 Split Tunnel is turned on in your setup.
This means:
- Only traffic destined for the internal network (defined earlier) goes through the VPN
- All other traffic (like internet browsing) goes directly through the user’s local connection
This is the most common setup, as it reduces load on the firewall and improves performance.
If disabled, all traffic would be forced through the VPN (full tunnel).
Endpoint Registration
This option is related to integration with Fortinet’s endpoint management (EMS).
It is not required for basic setups, so it can remain disabled unless you are using endpoint compliance or ZTNA features.
Once everything is configured, click Next to proceed to client options.
Step 4: Client Options
This step controls how the VPN behaves on the client side once configured in FortiClient.
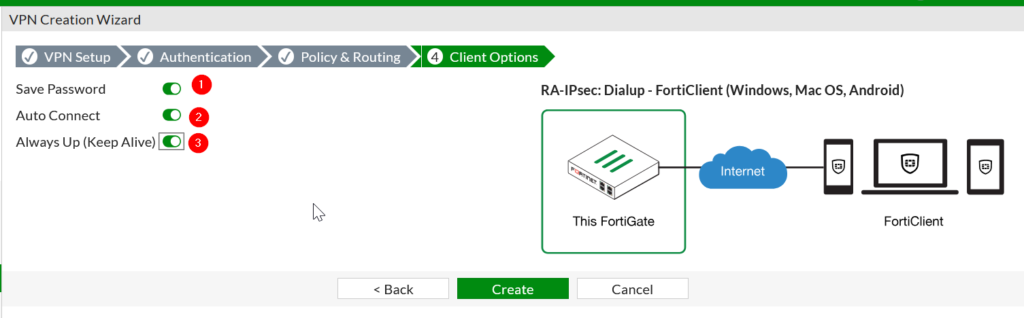
You will see a few convenience and behavior options here.
Save Password
When enabled, users can save their credentials in FortiClient.
This makes reconnecting easier, especially for users who connect frequently. In more security-sensitive environments, this can be disabled to force users to enter credentials each time.
Auto Connect
This option allows the VPN to automatically connect when FortiClient starts.
It’s useful for users who always need access to internal resources without manually initiating the connection.
Always Up (Keep Alive)
When enabled, the VPN will attempt to stay connected at all times.
If the connection drops, FortiClient will automatically try to re-establish it. This is helpful for maintaining stable access, especially in environments where connectivity may fluctuate.
Once these options are configured, click Create.
The FortiGate will now build the VPN tunnel along with the required policies and objects.
At this point, the VPN is configured on the firewall side.
Step 5: Verify the VPN Configuration
After clicking Create, FortiGate will attempt to build the VPN configuration.
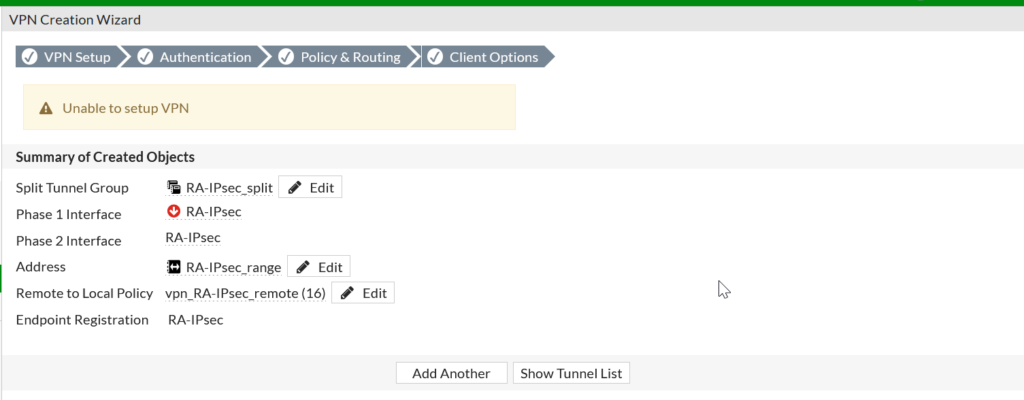
You may notice a message like:
“Unable to setup VPN”
This message can look concerning, but the VPN configuration is still created successfully.
If the tunnel is present under VPN → IPsec Tunnels and you are able to connect using FortiClient, you can safely ignore it.
To confirm the VPN was created, navigate to:
VPN → IPsec Tunnels
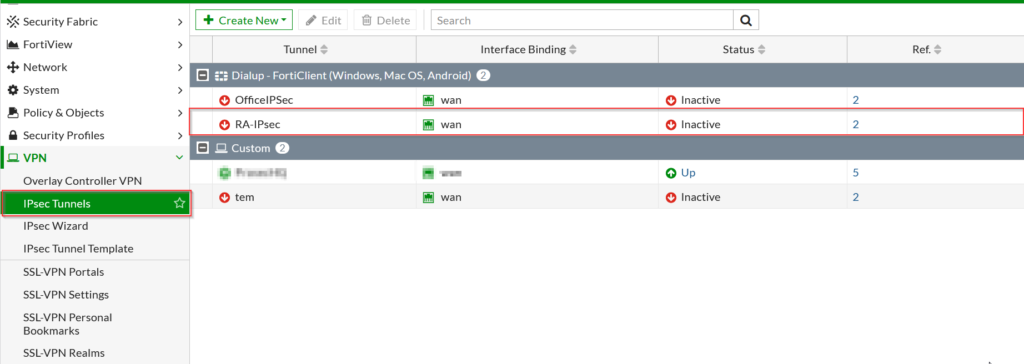
You should see your newly created tunnel (RA-IPSec) listed under Dialup – FortiClient.
At this stage, the tunnel will show as Inactive, which is normal. It will only come up when a client connects.
What to Check
- The tunnel exists under VPN → IPsec Tunnels
- It is bound to the correct interface (e.g., wan)
- No critical configuration errors are present
If needed, you can open the tunnel and modify any settings. Even though the wizard was used, the configuration is fully editable.
At this point, the FortiGate side is complete.
Next, we move to the client side and configure FortiClient to establish the connection.
Step 6: Configure FortiClient and Connect
With the FortiGate configuration complete, the next step is to configure the client side using FortiClient.
Create a New VPN Connection
Open FortiClient and create a new VPN connection.
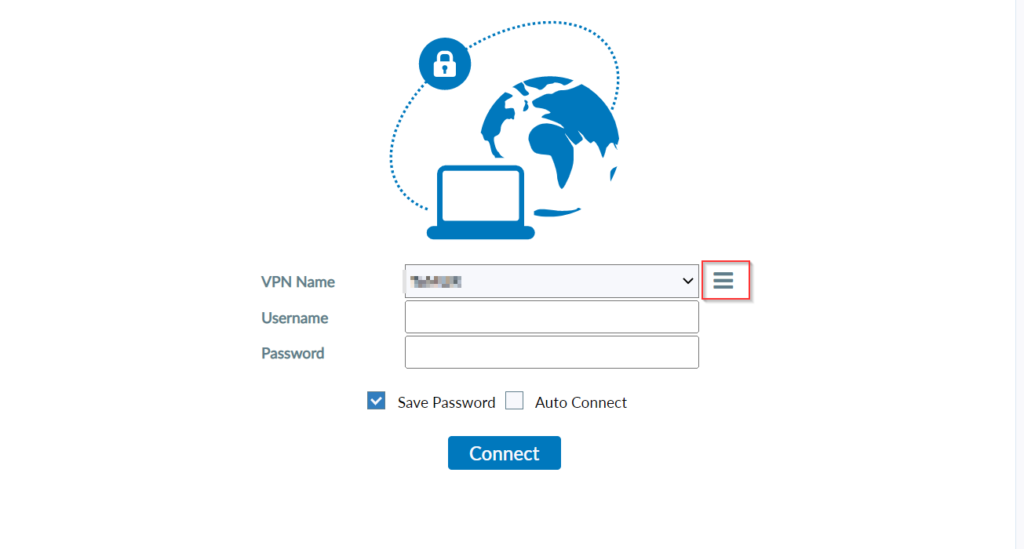
Select IPsec VPN, then define the connection details.
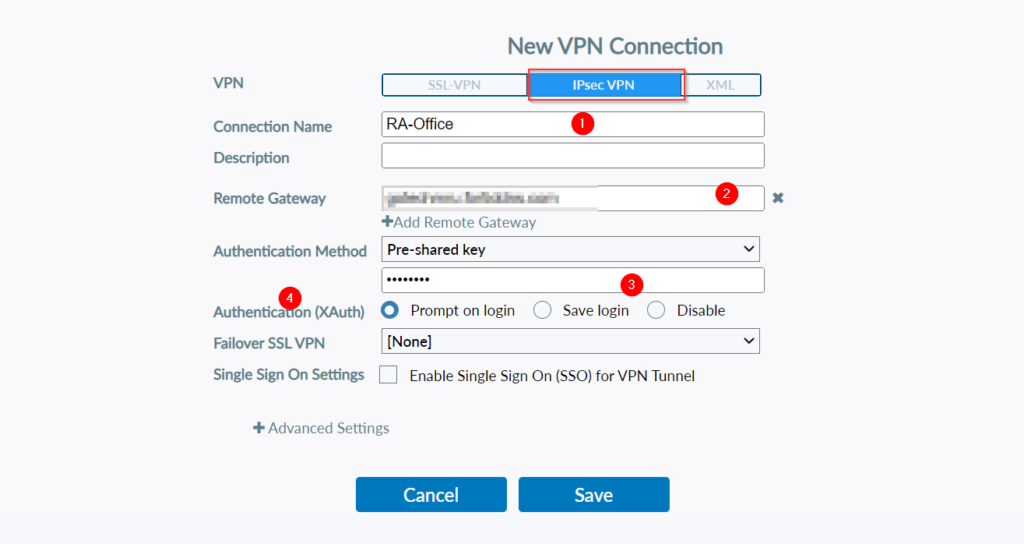
Configure the following:
- Connection Name: Any meaningful name (e.g., RA-Office)
- Remote Gateway: Public IP or FQDN of your FortiGate
- Authentication Method: Pre-shared Key
- Pre-shared Key: Same key configured on the FortiGate
For Authentication (XAuth), keep it set to:
- Prompt on login
This ensures the user is prompted for credentials during connection.
Save the configuration.
Initiate the Connection
Once the VPN profile is created, select it from the list.
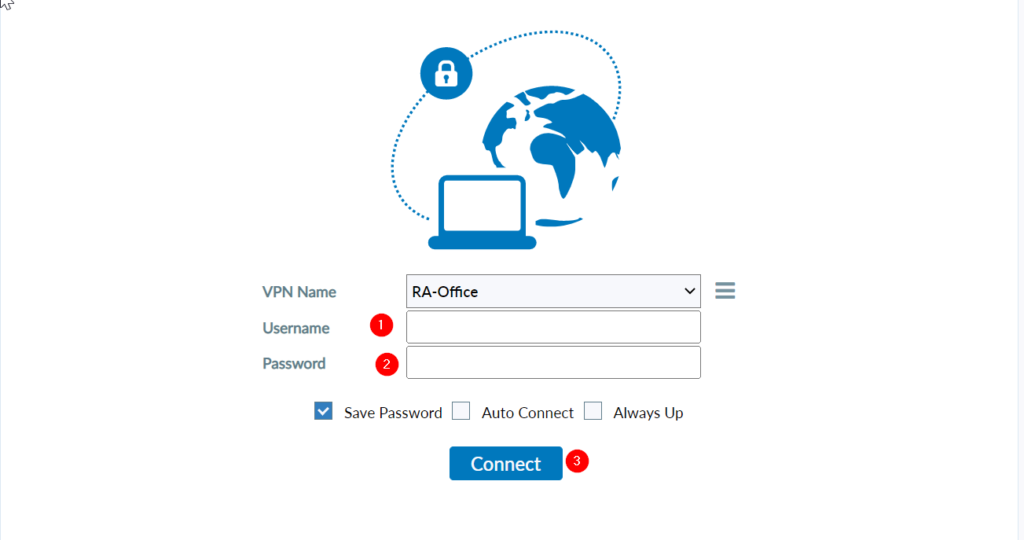
Enter your:
- Username
- Password
These must match a user from the group configured on the FortiGate.
Click Connect.
[IMAGE: Connecting / login screen]Verify the Connection
If the configuration is correct, the VPN will establish successfully.
[IMAGE: VPN connected confirmation screen]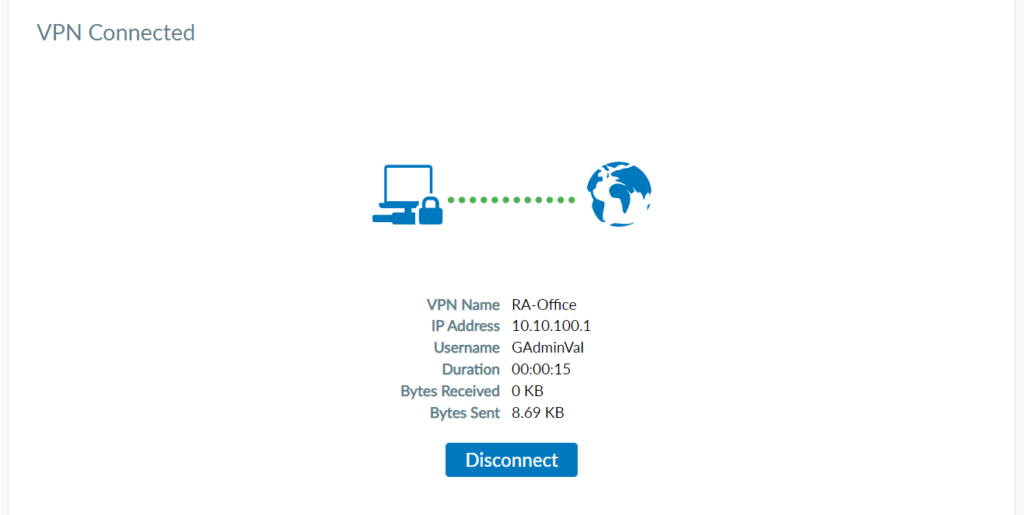
You will see:
- Assigned IP address (from the client range)
- Username
- Connection duration
- Traffic statistics
Confirm on the FortiGate
On the FortiGate, navigate to:
VPN → IPsec Tunnels
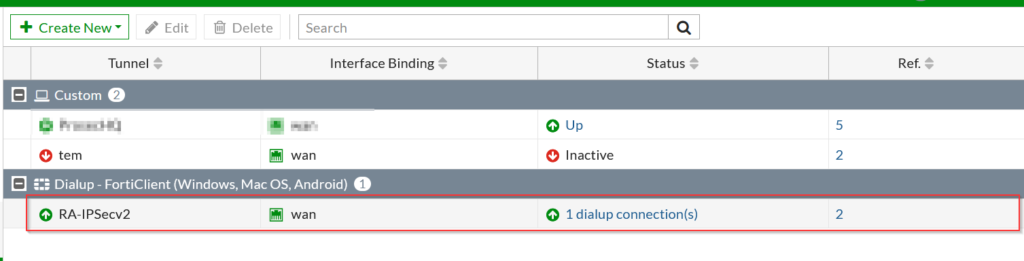
The tunnel will now show:
- 1 dialup connection(s)
- Status as Up
Verify Firewall Policy
The wizard automatically creates the required firewall policy.

This policy allows:
- Traffic from the VPN interface
- To the internal network (e.g., Lab subnet)
Without this policy, users would connect but not access any resources.
At this point, the setup is complete.
You now have a working IPsec remote access VPN using FortiClient, with full visibility from both the client and firewall side.
Conclusion
You’ve now built a working IPsec remote access VPN on a FortiGate using the wizard and verified it from both the firewall and client side.
While the wizard simplifies the process, it still creates a standard IPsec configuration that you can adjust at any time. As your requirements grow, you can refine the tunnel settings, tighten security, or integrate it with more advanced features.
With SSL VPN being phased out on newer firmware and devices, IPsec is becoming the practical path for remote access. Setting it up this way gives you a solid foundation that works across environments and scales with your needs.